 how-to
How to Inspect Used Engine Health: 2026 Buyer's Guide
Table of Contents
- Pre-Purchase Vehicle Inspection Checklist
- How to Perform a Compression Test
- Signs of a Blown Head Gasket
- Using Digital Tools to Verify Engine Health
- Safety Protocols for Engine Inspection
- Engine History and Warranty Expectations
- Frequently Asked Questions
Last Updated: September 11, 2026
Pre-Purchase Vehicle Inspection Checklist
Learning how to inspect used engine health starts long before you turn a key. A used engine is the single most expensive component you cannot fully see, and a failed one can turn a good deal into a financial disaster within months. This guide walks through the checks that separate a sound engine from a polished problem.
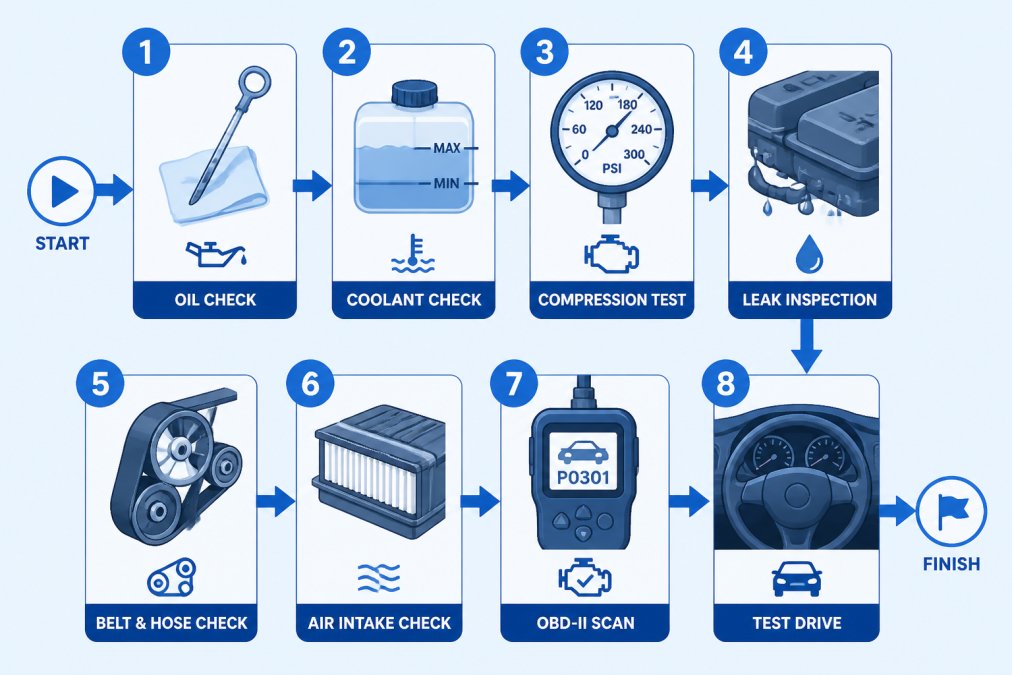
Start with the truck cold. A cold start reveals more than a warm one ever will, and sellers who insist on pre-warming the engine are hiding something. Work through this sequence:
- Check the oil dipstick for level, color, and grit
- Look under the vehicle for fresh puddles or weeping gaskets
- Inspect the coolant reservoir for discoloration or sludge
- Scan the engine bay for oil sludge around the valve cover
- Listen to the cold start for rattles, ticks, or misfires
- Watch the exhaust for blue, white, or black smoke
- Check the serpentine belt and timing belt condition
- Pull diagnostic trouble codes with an OBD-II scanner
A common mistake is skipping the cold start because the seller seems trustworthy. Trust the dipstick, not the handshake.
How to Perform a Compression Test
A compression test measures how well each cylinder seals, and it is the most reliable manual check of internal combustion health you can perform without tearing the engine down. You need a compression gauge, a spark plug socket, a ratchet extension, and about 45 minutes. On a V6 or V8, budget closer to an hour because rear cylinders are often buried under intake plumbing.
Total Time: 45-60 minutes Difficulty: Intermediate Tools: Compression gauge, spark plug socket, torque wrench, shop rag, pen and paper
- Warm the engine to operating temperature, then shut it off and let it cool for 10-15 minutes so you do not burn yourself on the exhaust or heads.
- Disable the ignition and fuel system, pull the fuel pump fuse or relay so you are not spraying fuel into the cylinders while cranking.
- Remove all spark plugs and label each one by cylinder. Reading the plugs themselves is half the value: a fouled or oil-soaked plug points to the cylinder that will read low.
- Thread the compression gauge into the first spark plug hole by hand until snug. Cross-threading an aluminum head is an expensive mistake.
- Have a helper hold the throttle wide open and crank the engine 4-6 revolutions. A closed throttle starves the cylinder and produces a falsely low reading.
- Record the reading, release the gauge pressure, and repeat for every cylinder. Keep the battery on a charger, a weak battery that slows cranking speed will drag every reading down.
- Compare readings across all cylinders, not just against the factory spec.
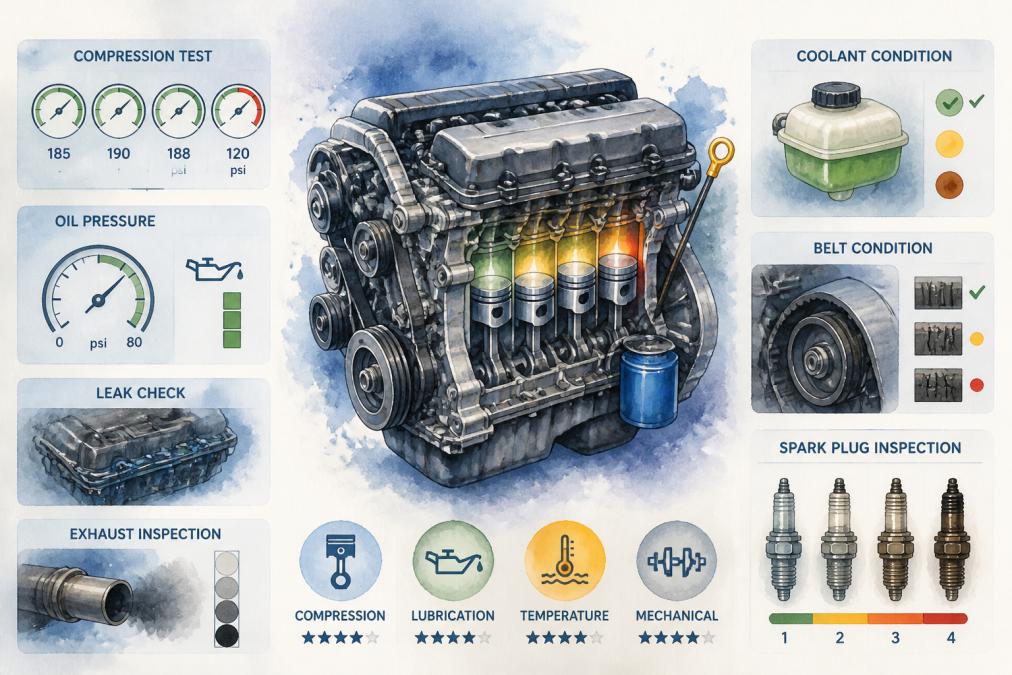
Reading the numbers. Most gasoline engines spec somewhere in the 120-180 psi range, but the exact figure varies by compression ratio, cam profile, and altitude, so always check the factory service spec for that engine. The number that matters most is the spread: cylinders should fall within about 10% of each other, and no single cylinder should sit more than roughly 15-20% below the highest reading. A engine with 150/148/152/149 psi is healthy even if the book says 165. An engine with 165/160/120/162 has a problem in cylinder three regardless of what the book says.
Dry versus wet test. Run the test dry first, record every number, then squirt about a capful of clean engine oil into each cylinder and repeat. The change tells you where the leak is:
- Reading jumps up after oil, the oil temporarily seals the gap, which points to worn piston rings or a worn cylinder wall.
- Reading stays low after oil, the leak is above the piston, which points to a burnt valve, a leaking valve seat, or a head gasket breach.
- Two adjacent cylinders both read low, a classic head gasket failure between those two bores.
Pair it with a leak-down test. A compression test tells you a cylinder is weak; a leak-down test tells you where the air is going. The leak-down procedure pressurizes the cylinder with the piston at top dead center on the compression stroke and measures the percentage of air that escapes. Under 10% loss is generally healthy; 20% or more signals a real sealing problem. Listen at the oil filler for ring leakage, at the intake for a leaking intake valve, at the exhaust for a leaking exhaust valve, and watch the coolant reservoir for bubbles that indicate a head gasket breach. The Engine Builder technical reference publishes acceptable variance ranges by engine family, and the Car Care Council buyer guidance outlines when a compression result should end the negotiation.
Signs of a Blown Head Gasket
A blown head gasket is the diagnosis every used-car buyer dreads, and the warning signs are specific. White smoke from the exhaust, a sweet coolant smell, and a coolant reservoir that keeps dropping without a visible leak all point the same direction.
Watch for these red flags:
- White smoke that lingers rather than dissipates
- Coolant contamination showing as milky oil or a chocolate-colored reservoir
- Overheating that returns after topping off coolant
- Bubbles in the coolant reservoir while the engine runs
- Sweet exhaust smell from the tailpipe
Coolant in the oil is the worst version. It turns oil into a milky emulsion that destroys bearings fast. If you see it, stop the inspection. The Car Care Council buyer guidance recommends walking away from any vehicle with confirmed coolant-oil mixing unless the price reflects a full engine rebuild.
Using Digital Tools to Verify Engine Health
An OBD-II scanner turns a guessing game into a data readout, and this is the step most used-engine guides skip entirely. Plug it into the port under the dash, usually within 12 inches of the steering column, and pull stored diagnostic trouble codes, pending codes, and live sensor data before you trust anything the seller says. A basic code reader costs under $50; a Bluetooth dongle paired with a phone app runs $20-$40 and gives you live data for the price of a tank of gas.
What to check on the scanner:
- Stored and pending codes. Stored codes are confirmed faults. Pending codes are faults the computer has seen once but not yet confirmed, they often surface before a stored code does, so they are the early warning system.
- Readiness monitors. This is the single most important check and the one almost nobody performs. Federal emissions rules require the engine computer to run a series of self-tests, catalyst, oxygen sensor, EVAP, misfire, and others, and report each as "ready" or "not ready." If several monitors show "not ready," someone recently cleared the codes with a scanner, and the underlying fault may still be present. A car that was just driven 200 miles should show most monitors ready. A car that shows all monitors "not ready" after a test drive is hiding something.
- Live misfire counters. Most scan tools display per-cylinder misfire counts in real time. Rev the engine and watch. A healthy engine shows zero or near-zero counts on every cylinder. A cylinder accumulating misfires at idle or under load is a mechanical or ignition problem, not a sensor glitch.
- Fuel trim values. Short-term and long-term fuel trim show how hard the computer is working to correct the air-fuel mixture. Long-term trim beyond roughly plus or minus 10% points to a vacuum leak, a failing mass airflow sensor, or leaking injectors. Positive trim means the computer is adding fuel; negative trim means it is pulling fuel.
- Oil pressure and coolant temperature. Watch both at idle and under load. Coolant temperature should climb to normal operating range and hold steady. Oil pressure should rise with RPM and stay within spec at hot idle.
- Mode 06 data. If your scanner supports it, mode 06 shows the raw pass/fail results of individual emissions and sensor tests, including misfire and catalyst efficiency. It is the deepest layer of OBD-II data a consumer tool can reach.
The gap most buyers miss. A clean code list proves nothing if the seller cleared the codes an hour before you arrived. Clearing codes resets the readiness monitors, and the fault will not reappear until the computer completes its drive cycle, which can take 50 to 100 miles of mixed driving. That is why you check readiness monitors first, then drive the car for at least 15-20 minutes with the scanner connected and watch for codes to reappear or monitors to flip to "not ready." If they do, the seller cleared a fault.
Verify the history, not just the codes. Pair the scan with a VIN-based history report from Carfax or AutoCheck to verify the odometer reading, check for reported accidents, and look for title brands like salvage or flood. Then cross-check the reported mileage against the wear items you can see: pedal pads, seat bolsters, and the odometer itself. A 60,000-mile car with a worn-out driver's seat and a shiny, low-mileage odometer is a rollback candidate. Ask for service records and confirm the timing belt or chain service interval has actually been performed, a missed timing belt is a $1,000-plus repair waiting to happen.
Safety Protocols for Engine Inspection
Engine inspection carries real physical risk, and most guides skip this entirely. A running engine has spinning belts, hot exhaust components, and pressurized cooling systems that can burn or injure you in seconds.
Follow these rules:
- Never reach near the serpentine belt or fan while the engine runs
- Let the engine cool before opening the radiator cap or coolant reservoir
- Keep loose clothing, jewelry, and long hair away from moving parts
- Work in a ventilated space, since exhaust contains carbon monoxide
- Use jack stands, never a jack alone, if you need to get under the vehicle
A burn from a hot exhaust manifold or a scalding coolant spray is entirely preventable. Treat every running engine as live equipment.
Engine History and Warranty Expectations
Engine history verification is the step buyers skip and regret. A clean engine today can hide a rebuild, a replacement, or years of deferred maintenance. Ask for service records, check the VIN against history reports, and confirm the timing belt service interval has been met.
Warranty expectations matter just as much. A used vehicle may still carry remaining powertrain coverage from the original manufacturer, or it may come with a dealer-provided limited warranty. Ask directly:
| Coverage Type | What It Typically Covers | What to Verify |
|---|---|---|
| Remaining factory powertrain | Engine internals, transmission | Transferability and expiration date |
| Dealer limited warranty | Specified components, set term | Exclusions and claim process |
| Extended service contract | Named parts, mileage cap | Deductible and repair shop rules |
| As-is sale | Nothing | State law on implied warranties |
Get every warranty term in writing before you sign. Verbal promises about engine coverage are worth nothing when a rod bearing lets go six months later.
Frequently Asked Questions
What is the $3000 rule for car repairs?
The $3000 rule is a guideline suggesting that if the cost of needed repairs exceeds $3000 or the vehicle's value, it may be better to replace the car. This is not an official rule but a common threshold in the used car market. When inspecting engine health, if you find issues that could lead to costly repairs like a blown head gasket or internal damage, consider whether the investment is worth it. Always get a pre-purchase inspection to avoid surprises.
Is there a way to check engine health without a mechanic?
Yes, you can perform several checks yourself. Start with a visual inspection for leaks or puddles under the car. Check the oil condition and look for metallic shavings or sludge. Use an OBD-II scanner to read diagnostic trouble codes. Listen for unusual noises like knocking or ticking. Check for smoke from the exhaust, which can indicate oil or coolant burning. While these steps can reveal problems, a professional inspection is still recommended for a thorough evaluation.
What are the most common signs of internal engine damage?
Common signs include blue or white smoke from the exhaust, a burnt oil smell, metallic shavings in the oil, and overheating. You might also hear knocking or ticking noises, especially during cold starts. A compression test can reveal low or uneven compression, indicating worn piston rings or valve issues. If you notice any of these, have a mechanic inspect the engine before buying, as internal damage can be expensive to repair.
How do you interpret engine oil color and consistency?
Engine oil should be amber to dark brown and smooth. Black, gritty oil with metallic shavings suggests neglect or internal wear. Milky or frothy oil indicates coolant contamination, often from a blown head gasket. If the oil smells burnt, it may have overheated. Always check the oil level and condition when inspecting a used car; it's a quick way to gauge engine health and maintenance history.
A used engine is a gamble only when you skip the inspection. At AutoSport USA, we help buyers avoid that gamble with a diverse inventory of quality used vehicles, transparent pricing, and online financing tools that let you apply from home. Our team supports trade-in valuations so you can close the deal without the back-and-forth. Get started with AutoSport USA and drive away knowing exactly what is under the hood.