 ultimate-guide
Used Car Inspection Checklist for Buyers
Table of Contents
- What to Check Before Buying a Used Car
- Complete Used Car Pre-Purchase Inspection Guide
- Used Car Inspection Checklist PDF and Documentation
- Used Car Test Drive Checklist
- How Long Does a Pre-Purchase Car Inspection Take
- Verifying Vehicle History, Title Status, and Recalls
- Interpreting Inspection Results and Negotiating Repairs
- Frequently Asked Questions
Last Updated: October 10, 2026
What to Check Before Buying a Used Car
A used car inspection checklist for buyers is your best defense against costly surprises after purchase.
The process doesn't require a mechanic's license, just a systematic approach and attention to detail. We'll walk you through every critical area you need to examine, from the exterior paint to the engine bay, so you can make an informed decision before signing paperwork.
Most buyers focus only on how the car looks and drives. They miss the warning signs hiding underneath and in the details. This guide covers the complete used car inspection checklist that separates savvy buyers from those who end up with repair bills they didn't anticipate.
Complete Used Car Pre-Purchase Inspection Guide
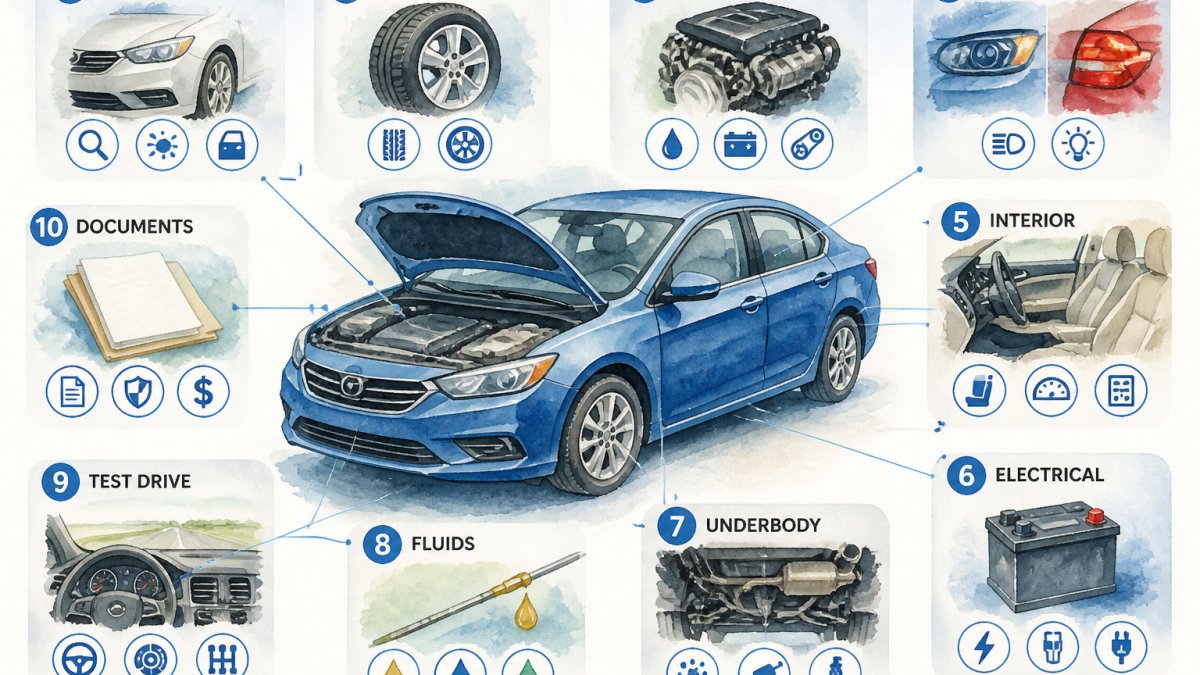
A thorough used car pre-purchase inspection takes patience and a methodical approach. You'll examine multiple systems, exterior condition, mechanical components, electrical systems, and the vehicle's history. The goal is to identify both obvious damage and subtle issues that could become expensive problems.
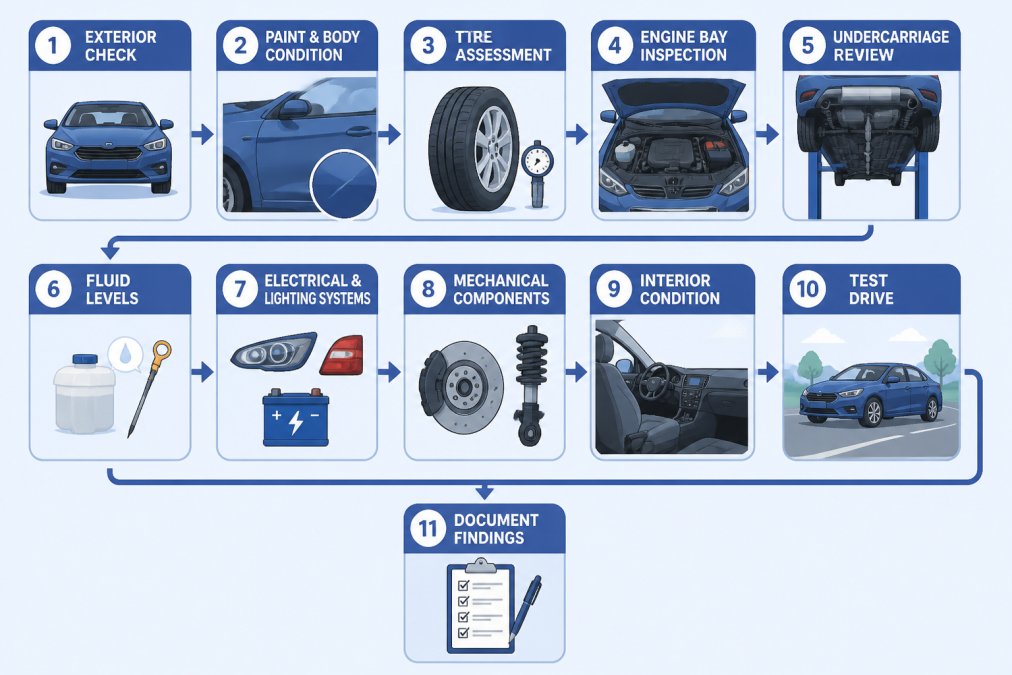
Start with the exterior in daylight. Walk around the entire vehicle and look for paint inconsistencies, rust spots, dents, and misaligned body panels. Check each door, window, and trim piece. Open the hood and inspect the engine bay for leaks, corrosion, and wear.
Exterior Body and Paint Condition
The exterior tells you how the previous owner treated the vehicle. Look for consistent paint color and finish across all panels. Faded or mismatched paint suggests accident damage or poor maintenance. Check for rust, especially around wheel wells, door edges, and the underside of the bumpers.
Run your hand across the body to feel for dents and imperfections. Use a flashlight to inspect panel gaps, they should be even and consistent. Uneven gaps indicate the panel has been replaced, which may signal previous collision damage. Examine all trim, molding, and weatherstripping for cracks or deterioration.
Tires, Tread Wear, and Tire Pressure
Tire condition reveals how the vehicle was driven and maintained. Use the penny test: insert a penny into the tread with Lincoln's head upside down. If you can see the top of his head, the tread is too worn.
Check all four tires for uneven wear patterns. Wear on one side suggests alignment problems. Wear in the center indicates overinflation, while edge wear suggests underinflation. Look for cracks, bulges, or embedded objects. Verify that all four tires match in brand and size, mismatched tires can indicate poor maintenance or previous damage repairs.
Engine Condition and Visible Leaks
Open the hood and inspect the engine with the car cold. Look for oil, coolant, or transmission fluid leaks around the engine block, gaskets, and hoses. Leaks indicate worn seals or gaskets that will require repair. Check the condition of hoses and belts, they should be flexible, not cracked or brittle.
Examine the engine block and cylinder head for corrosion or white crusty deposits, which signal coolant leaks or overheating history. Look at the battery terminals for corrosion or loose connections. Check the air filter, a dirty filter suggests deferred maintenance. Smell the engine area; a burnt smell may indicate electrical problems or fluid leaks.
Oil Level and Fluid Checks
Pull the dipstick and wipe it clean, then reinsert it fully and pull it out again to check the oil level. The oil should reach the "full" mark. Low oil indicates either a leak or poor maintenance.
Check all other fluids: coolant, transmission fluid, brake fluid, and power steering fluid. Coolant should be bright green or pink, not brown or murky. Transmission fluid should be bright red or pink; dark or burnt-smelling fluid signals transmission problems. Brake fluid should be clear to slightly amber; dark or cloudy fluid needs replacement.
Undercarriage Condition, Rust, and Damage
The undercarriage is where rust and hidden damage hide. Get the car on a lift or use a creeper to slide underneath. Inspect the frame for rust, dents, or welding marks that suggest accident repair. Check the suspension components, springs, shocks, and control arms, for corrosion or damage.
Examine the transmission and engine oil pan for leaks. Check the fuel tank and fuel lines for damage. Look at the brake lines and hydraulic components for corrosion. Rust on the undercarriage is normal in older vehicles, but deep pitting or structural damage is a serious concern. Document any rust with photos; you'll use this information when negotiating price.
Electrical and Electronic Systems
Test all electrical components with the engine running. Turn on the headlights and high beams, they should be bright and even. Check the fog lights, brake lights, reverse lights, and turn signals. Test the interior dome light and dashboard lights. Verify that the power windows, locks, and mirrors work smoothly.
Check the dashboard for warning lights. A check-engine light or other illuminated warning indicates a diagnostic trouble code that needs investigation. Test the air conditioning and heating, both should reach comfortable temperatures. Verify that the stereo and any infotainment systems function. Look for signs of water damage in the interior, which suggests a leak or flood history.
Windshield, Windows, Wipers, and Lights
Inspect the windshield for cracks or chips. Small chips away from the driver's line of sight are acceptable, but cracks spreading across the glass require replacement. Check all side windows and the rear window for cracks or damage. Test the windshield wipers, they should move smoothly and make clean passes without streaking.
Examine all exterior lights: headlights, taillights, brake lights, turn signals, and side markers. Walk around the car with the engine running and have someone press the brake pedal while you watch the brake lights. Check that all lights illuminate and none are burnt out. Burnt-out lights are inexpensive to replace, but they indicate deferred maintenance.
Mechanical Systems and Components
Test the brakes by applying firm pressure on the brake pedal. It should feel solid, not spongy or soft. Listen for grinding or squealing, which indicates worn brake pads or damaged rotors. Check the steering, it should respond smoothly without play or resistance.
Inspect the suspension by pressing down on each corner of the car. It should bounce once or twice and settle, not continue bouncing. Listen for creaking or clunking sounds. Check the transmission by shifting through all gears with the engine running, shifts should be smooth without grinding or hesitation. Look for transmission fluid leaks beneath the car.
Used Car Inspection Checklist PDF and Documentation
Create a written record of your inspection findings. This documentation serves two purposes: it helps you remember details when comparing vehicles, and it provides evidence if you need to negotiate repairs or price reductions with the seller.
Use a structured format that covers each system. Include the vehicle's VIN, mileage, date of inspection, and seller information at the top.
Many buyers find it helpful to print a checklist before visiting the dealership or private seller. After the inspection, review your notes and compare them with the seller's description and any warranty information.
Used Car Test Drive Checklist
The test drive is where you assess how the vehicle actually performs. Before starting the engine, sit in the driver's seat and adjust the mirrors, seat, and steering wheel.
Start the engine and listen for smooth operation without grinding, knocking, or rattling. Check that the engine idles smoothly without stalling or racing. Test the transmission by shifting into Drive and Reverse, shifts should be smooth and immediate.
Drive on a mix of roads: city streets, highways, and curves. Listen for unusual noises from the engine, transmission, suspension, or brakes. Feel the steering response at different speeds. Test the air conditioning and heating.
How Long Does a Pre-Purchase Car Inspection Take
A thorough used car inspection checklist evaluation typically takes 45 to 90 minutes, depending on the vehicle's condition and complexity. A quick visual inspection might take 20 to 30 minutes, but that approach misses critical issues.
Allocate time for each phase: 10 minutes for exterior inspection, 15 minutes for the engine bay and undercarriage, 10 minutes for electrical and lighting systems, 20 minutes for the test drive, and 10 minutes for documentation and notes. If you discover significant problems, you may spend additional time investigating specific systems or taking photos. Don't rush, a thorough inspection now saves thousands in repair costs later.
Verifying Vehicle History, Title Status, and Recalls
Before finalizing your purchase, verify the vehicle's history and ownership status. Obtain a vehicle history report using the VIN, services like Carfax and AutoCheck provide accident history, service records, title status, and odometer readings.
Check the title status with your state's motor vehicle department. Ensure the seller's name matches the title, and verify that the title is clear (no liens).
Contact the previous owner if possible and ask about maintenance history, known issues, and why they're selling the vehicle. Their answers may reveal problems the inspection didn't uncover. Request service records to verify that the vehicle was maintained according to the manufacturer's schedule.
Interpreting Inspection Results and Negotiating Repairs
After completing your inspection, review your findings and decide whether to proceed, negotiate, or walk away. Minor issues like worn brake pads or a burnt-out bulb are inexpensive repairs.
Get repair estimates from an independent mechanic for any major issues you discovered. Use these estimates to negotiate the price down or request that the seller complete the repairs before sale.
Know when to walk away. If the vehicle has major mechanical problems, extensive rust, or a questionable history, the risk of future repairs may outweigh the savings from a lower purchase price. There are always more cars available.
Frequently Asked Questions
Should you get a pre-purchase inspection on a used car?
Yes. A pre-purchase inspection identifies hidden mechanical, electrical, and structural issues before you buy. Many buyers discover major problems only after purchase, leading to costly repairs. An independent mechanic's inspection protects your investment by revealing the true condition of the vehicle and giving you negotiating power on price or repairs.
What should you check under the hood when buying a used car?
Check the engine oil level, color, and condition using the dipstick. Inspect the coolant, brake fluid, and transmission fluid reservoirs for adequate levels and discoloration. Look for visible fluid leaks, corrosion on battery terminals, cracked hoses, and worn belts. Listen for unusual noises and check if the engine starts smoothly. These checks reveal maintenance history and potential mechanical issues.
How long does a pre-purchase car inspection take?
A thorough pre-purchase inspection typically takes 1 to 2 hours. This allows time for visual checks of exterior, undercarriage, interior, and engine; fluid level verification; electrical system testing; and a test drive. A rushed inspection lasting under 30 minutes may miss important defects. Budget adequate time for a comprehensive review before committing to the purchase.
What are signs that a used car has been in an accident?
Look for misaligned body panels, uneven paint color or texture, ripples in the metal, and overspray on rubber seals or windows. Check if door and hood gaps are consistent. Inspect the undercarriage for welding marks, bent frame rails, or replacement parts. Pull the carpet back to check for water stains or rust. Request the vehicle history report to confirm accident history and verify findings during your inspection.
What documents should you verify before buying a used car?
Obtain a vehicle history report (CARFAX or AutoCheck) to verify title status, ownership history, accident records, and service records. Check the odometer reading against the title and service records for consistency. Verify the VIN matches across the title, door jamb, and engine block. Confirm no outstanding recalls exist and that the title is clean with no liens. Request maintenance records to assess how well the vehicle was maintained.
How do you inspect a used car during a test drive?
Listen for unusual engine noises, grinding, or knocking. Test acceleration, braking, and steering responsiveness. Check that the transmission shifts smoothly without hesitation or jerking. Verify all lights, wipers, and climate controls function properly. Test the brake pedal firmness and stopping distance. Drive on highways to assess stability and handling. Note any warning lights on the dashboard and address them before purchase.
At AutoSport USA, we understand the concerns you have when buying used. Our team in Toms River has helped countless buyers find reliable vehicles through transparent inspection and fair pricing. When you work with us, you're getting vehicles that have been thoroughly evaluated, so you can buy with confidence. Our online financing tools and trade-in valuations make the process seamless. Get started with AutoSport USA and drive home in a vehicle you trust.